Hey There!
This documentation is under development and will be available shortly.
If you've already purchased the Drive Theme for HubSpot CMS please email droma@driveagency.co to receive the updated docs and to schedule a consultation.
Thanks!
Multi-Language Content
You can manage content for your global audience in multiple languages on your landing pages and website pages.
Stripe Checkout
Accept one-time card payments with Stripe
About Stripe Checkout
With the client-only integration, you define your products directly in the Stripe Dashboard and reference them by ID on the client side. It is best suited for simple integrations that don’t need dynamic pricing.
The client-only integration has several other notable differences. This integration does not support associating payments with existing Customer objects or placing a hold on a card before charging it.
If the limitations of the client-only integration make it unsuitable for your use case, use the client & server integration instead.
API Key
Stripe authenticates your API requests using your account’s API keys. If you do not include your key when making an API request, or use one that is incorrect or outdated, Stripe returns an error.
Every account is provided with separate keys for testing and for running live transactions. All API requests exist in either test or live mode, and objects—customers, plans, coupons, and so forth—in one mode cannot be manipulated by objects in the other.
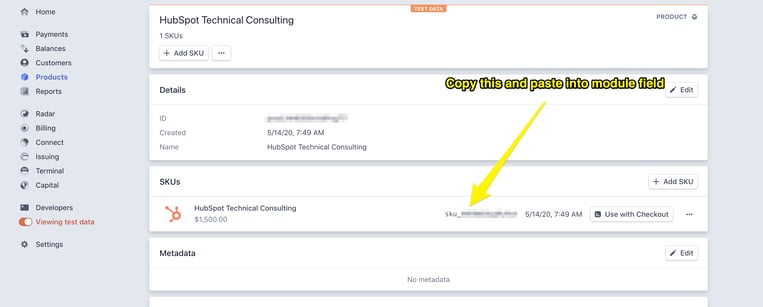
Product Id
To use Checkout, you first need to create a Product and a Price. Different physical goods or levels of service should be represented by products. Each product’s pricing is represented by one or more prices.
You can either create a product through the Stripe Dashboard - learn more about creating a product here
Once you've created a product, copy and past the product id into the module field
Success URL
When your customer completes a payment, Stripe redirects them to the URL that you specified in the
success_url parameter. Typically, this is a page on your website that informs your customer that their payment was successful.Before going live, make sure to configure your domains list in the Dashboard to match the success and cancel URLs.
Cancel URL
When your customer clicks on your logo in a Checkout session without completing a payment, Checkout redirects them back to your website by navigating to the cancel URL you specified when configuring the code snippet.
Typically, this is the page on your website that the customer viewed prior to redirecting to Checkout.
Before going live, make sure to configure your domains list in the Dashboard to match the success and cancel URLs.